
How to Build Your Own Bookshelf at Home is one of the most fulfilling do-it-yourself pastimes. It’s also less expensive than store-bought furniture and lets you personalize the piece to match your space exactly. Whether you’re building a large wall-to-wall unit or a tiny shelf for a comfortable reading nook, this project can be modified to fit your style, the materials you have on hand, and your level of expertise.
It’s crucial to thoroughly plan your design before you begin. Think about the bookshelf’s intended location and the contents it will include, such as books, décor, or even plants. You can choose the appropriate proportions and materials by weighing and measuring these items. Make a paper sketch of your idea, noting the width, height, and number of shelves you’ll want. This preliminary planning stage will guarantee a strong, fashionable outcome and help you avoid mistakes later.
How to Increase Home Value Before Selling
Another crucial element is selecting the appropriate materials. Popular options include plywood, MDF, and real wood, depending on your desired finish and budget. MDF is smooth and simple to paint, whereas solid wood is long-lasting and has a natural appearance. A saw, drill, measuring tape, screws, and sandpaper are additional tools you’ll need. Before you begin cutting, make sure everything is prepared.
Finally, remember that Building your own bookshelf at home is more than just putting things together; it’s a chance to show off your ingenuity. You can paint the wood in vibrant colors for a contemporary look, stain it for a rustic look, or add elaborate trims for elegance. When your do-it-yourself bookshelf is complete, it will serve as more than just a shelf for books; it will be a focal point that showcases your own style and skill.
Choosing the Right Materials for Your Bookshelf
How to Build Your Own Bookshelf at Home Choosing the appropriate materials to guarantee strength and aesthetic appeal is the first step in Building your own bookshelf at home. The type of wood you select affects the final piece’s overall appearance as well as its longevity. Solid woods like oak, pine, or maple make great bookshelves, but plywood or MDF are more reasonably priced and manageable options. Before choosing, think about your preferences, your spending limit, and how the bookshelf will blend in with the rest of the decor in your home.
Medium-Density Fiberboard, or MDF, is a common material for modern interiors since it is smooth and perfect for painting. Conversely, plywood provides a wonderful mix of affordability and robustness. Real wood will last longer but may cost a little more if you desire a warm, natural finish.
In addition to high-quality wood, having strong hardware is crucial when learning How to Build Your Own Bookshelf at Home. Your bookshelf’s stability and security are guaranteed with sturdy screws, long-lasting metal brackets, and premium wood glue. Nails can become loose with time, especially when heavy books are placed on them, so don’t rely just on them. To ensure a durable, dependable outcome, always select materials made to support weight without warping or cracking.
Lastly, pay close attention to the texture and finish when learning How to Build Your Own Bookshelf at Home. Apply a protective varnish to maintain the wood’s inherent beauty if you like a rustic appearance. Use paint or a glossy finish that goes well with the décor of your space for a sleek, contemporary look. Whichever option you select, using high-quality materials and finishing touches will guarantee that your bookshelf remains strong, fashionable, and useful for many years to come.
Planning Your Bookshelf Design
How to Build Your Own Bookshelf at Home The design process is one of the most fun aspects of How to Build Your Own Bookshelf at Home. Start by thinking about what it will be used for: will it house books alone, or will it also house plants, artwork, and décor? Your response will influence the general layout and style. While a bookshelf designed primarily for books should have deeper shelves and stronger boards to withstand additional weight, a decorative bookshelf can have open, airy shelving.
Before you begin How to Build Your Own Bookshelf at Home, take accurate measurements of the space you plan to use. The maximum size of your bookshelf will depend on the width and height of your wall or corner. Be sure to leave enough room for movement and ventilation along the sides and top. Visualize your design by sketching it out or using a simple online design tool—this step helps you refine your plan and avoid costly mistakes during construction.
You should choose the style as well. The intricacy and aesthetic appeal of full wall units, floating shelves, and ladder-style bookcases vary. Start small if you’re a newbie; a simple rectangle bookshelf is a terrific way to gain confidence. After you feel at ease, you can try out modular or angled designs.
The number of shelves and the distance between them should be taken into account while organizing How to Build Your Own Bookshelf at Home. Taller objects or ornamental pieces may require more space than the typical bookshelf, which has shelves set roughly 10 to 12 inches apart. Making these decisions beforehand can streamline the construction process and guarantee that your bookshelf satisfies your practical and aesthetic requirements.
Measuring and Cutting the Wood
Clear cuts and precise measurements are essential when working on How to Build Your Own Bookshelf at Home in order to produce a strong and polished object. Make sure to carefully double-check all of your measurements before cutting. In woodworking, the adage “measure twice, cut once” is accurate because even a minor error can result in uneven shelves or a shaky structure. Use a dependable measuring tape and label each wood piece properly with a pencil for precision and confidence during building.
After marking your boards, carefully cut them with a hand saw or circular saw. If you’ve never cut wood before, anchor your pieces firmly to a workstation to keep them from moving. It can be challenging to assemble later if your cuts are not straight and smooth. Label each piece after cutting so you can quickly determine which portion goes where during the cutting.
Remember to be safe. When cutting, always wear a dust mask, gloves, and protective eyewear. Work outside or in an area with good ventilation if you can to prevent sawdust inhalation. When it comes to do-it-yourself woodworking, safety is just as crucial as accuracy.
Once all of your cuts in How to Build Your Own Bookshelf at Home are finished, carefully sand the edges to get rid of any splinters or rough places. This process guarantees a smoother surface and promotes even application of paint or stain. A sturdy, well-constructed bookshelf is built on precise measurement, cutting, and sanding, which ensures that every component fits snugly and securely for a polished end product.
Assembling Your Bookshelf Step by Step
It’s time to begin putting your How to Build Your Own Bookshelf at Home together after all of your wood components have been measured and cut. To make sure everything fits your design plan, start by arranging all the components on a level surface. Use wood glue and screws to secure the two side panels to the foundation for more stability. While the glue cures, use clamps to keep the parts firmly in place. Make sure everything is square before tightening the screws because even a tiny angle error might cause the bookshelf as a whole to tilt or wobble.
Then, using the same procedure, fasten the top panel to the sides. Verify your measurements again to make sure all the edges line up correctly. A carpenter’s square can be used to verify correct angles. Installing the shelves comes once the top and bottom panels are firmly in place. For a more conventional style, you can select fixed shelves, or for more versatility, you can use shelf pins to make them flexible. Each fixed shelf should be spaced evenly apart and screwed into position.
Durability depends on reinforcement. A plywood or MDF back panel reinforces the overall structure and keeps it from swinging. Attach the back panel to the sides and back edges of the shelves with screws or nails. This small action has a significant impact on longevity and stability.
Sand all joints and edges lightly to provide a smooth, completed surface when the main construction is finished. Before painting or finishing, remove any dust. When done correctly, the assembly step lays the groundwork for a strong, elegant bookshelf of which you can be proud. However, it does need patience and attention to detail.
Sanding and Preparing the Surface
For a smooth, polished appearance, your bookshelf must be well sanded and surface prepared before painting or staining. To start, use medium-grit sandpaper to smooth off the wood’s flaws, blemishes, and sharp edges. To prevent scratches that could later be visible under paint or varnish, sand down the grain rather than across it. For a smoother texture, use fine-grit paper after finishing the harsh sanding.
After sanding, use a moist towel or tack cloth to clean down the entire bookshelf to get rid of any dust. Because even small dust particles can leave bumps or streaks that detract from your final finish, this step is essential. Before giving your wood another light sanding, fill in any dents or holes with wood filler and After sanding, use a moist towel or tack cloth to clean down the entire bookshelf to get rid of any dust.
Because even small dust particles can leave bumps or streaks that detract from your final finish, this step is essential. Before giving your wood another light sanding, fill in any dents or holes with wood filler and allow it to dry completely. Paint or stain will apply evenly and seem perfect on smooth surfaces.
Put a coat of primer on your bookshelf before painting it. Primer makes the color seem more vivid, conceals flaws, and seals the wood. Applying a pre-stain conditioner before staining will help the stain absorb evenly and prevent blotchy results, especially on softwoods like pine.
Last but not least, look for any rough patches on the edges and corners. A flawlessly sanded surface is essential for a premium finish that appears store-bought. By taking your time, you can make sure that your bookcase will look stunning, feel smooth to the touch, and endure for many years to come.
Painting or Staining Your Bookshelf
If you opt for painting, begin with a good-quality primer to ensure better adhesion and longevity of the paint. When dry, use a brush or roller to apply two to three layers of paint with smooth, even strokes. Before applying the next coat, let each one dry fully. To achieve a perfect finish, use fine-grit sandpaper to lightly sand between coats. To add shine and protect against scratches, you can seal the paint with a clear polyurethane topcoat.
When applying stain, use a clean cloth or foam brush to ensure an even application while working along the direction of the wood grain. After a few minutes, depending on your desired finish darkness, remove any excess. Once the surface is dry, use a clear varnish or polyurethane to safeguard it and provide a glossy finish. Staining enhances the wood’s inherent character and texture, contributing warmth and sophistication.
Regardless of the finish you select, allow the bookshelf to dry completely before moving or loading it. By painting or staining your bookshelf, you can improve your décor while also prolonging the life of your DIY project—it will be both stylish and durable.
Adding Decorative Touches
With your bookshelf now built and finished, it’s time to add decorative touches that will make it pop. Simple touches such as trim moldings, decorative edges, or corner brackets can enhance the overall appearance from basic to custom. To achieve a more polished look, you can add wooden or metal trims around the edges. To achieve a farmhouse-style aesthetic, think about lightly distressing the paint or incorporating antique hardware details.
Using contrasting colors and textures is another excellent method for customizing your bookshelf. Use a different color for the back panel than for the shelves to add depth and visual appeal. It is also a creative and trendy option to wallpaper the inside back of the shelves, adding pattern and personality. This minor element can entirely change the appearance and ambiance of your bookshelf within the room.
Another decorative aspect to take into account is lighting. To accentuate your favorite books or decor items, you can install small LED strip lights or puck lights along the shelves. In addition to enhancing the ambiance, they increase the functionality of your bookshelf in low-light areas.
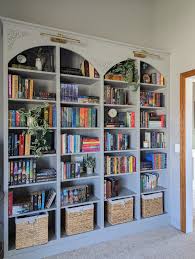
It is in styling your bookshelf that creativity really sparkles. Instead of crowding every inch with books, consider mixing items of various heights and textures. To create visual interest, stack books both vertically and horizontally, and include small decorative items such as framed pictures, vases, plants, or sculptures.
This mix gives character while preventing the shelf from appearing messy.Another important factor in making a display visually appealing is the coordination of colors. For a modern, cohesive look, arrange your books by color; for practicality, group them by genre. Ensure that there is some empty space on each shelf — this contributes to a balanced overall design and maintains a light, open feel.
Finally, update your styling every couple of months. Change the position of decor items, replace seasonal accents, or reorganize your books to maintain interest.
Constructing your bookshelf is just the first part of the journey; upkeep guarantees that it remains robust and attractive for years to come. Begin by regularly removing dust with a soft cloth or a duster made of microfiber. Over time, dust accumulation can make the surface lose its luster and give your bookshelf a worn appearance. To preserve the finish of wooden bookshelves, avoid harsh chemicals and opt for a mild wood cleaner or a natural water-and-vinegar solution instead.
Watch for indications of deterioration, like screws that are not tight or shelves that are unstable. Secure all hardware right away to avert structural problems.To prevent sagging and prolong its lifespan, it is essential to keep a single shelf balanced, as overloading it can lead to issues.
Sunlight and humidity can influence how long your bookshelf lasts. Excess moisture can lead to wood swelling, whereas direct sunlight may cause paint or stain to fade. Position your bookshelf away from direct heat sources and windows if possible, or use curtains and blinds to minimize exposure. To keep your bookshelf in excellent condition, ensure that the indoor environment remains stable.
Lastly, think about putting on a new coat of paint or polish every few years to maintain its fresh appearance. Regular upkeep not only safeguards your efforts but also guarantees that your bookshelf stays a lovely and practical feature of your home for years to come.
The bookshelf rule first gained attention in the context of minimalism. The concept is straightforward: if you want to add something new to a full bookshelf, you must remove something else. This limitation forces you to consider what you value most. It can apply to books, clothing, kitchenware or even digital files.
Miniature Book Display Case Cabinet Holder:The Anxiety Bookshelf is a handmade miniature wooden bookshelf with about 200 miniature books. Length 10 inches,height 8 inches,thickness 4 inches. and if you don’t like them,you can shake them and start over.
1 thought on “How to Build Your Own Bookshelf at Home”